In conclusion
I really enjoyed the Redheads and Royalty project from learning the techniques
in class, to the personal research at home and the designing and recording
everything on the blog. It was really satisfying seeing everything come
together at the end once we had both completed our assessments. I feel like
from the beginning of the course to the end of our first term I have come a
long way with my hair styling and am now feeling a lot more confident and
looking forward to progressing with my skills even more in our second term. The
techniques we have learnt are invaluable and will be not only useful for this
project, but throughout the entire course and eventually our careers. The
practical sessions equipped us with everything we needed to know in order to
complete the brief. I really enjoyed looking at the Elizabethan history of hair
styling and how it has been used by almost every prominent fashion designer on
the catwalk, each showcasing creative and innovative contemporary designs which
I found to be very inspiring as I love the avant-garde high fashion make-up and
hair styling. I also enjoyed working as a team with my partner as its very good
practise and is an important skill to be able to work to a design created by
someone else and pull it off as accurately as possible as this is what we will
be expected to do as professionals when working in the industry in the future.
Thursday, 4 December 2014
Timed assessment in the role of the designer
After giving Sera my design and notes she had a chance to practise it before the real timed assessment and here are some pictures of her first attempt:


Here are the final images Sera took after our real timed assessment:


Sera has been a really good partner throughout this project as she has always been really well organised, punctual and attended all classes when we practised our designs and was free to meet up outside of uni to practise some more. She did really well in our timed assessment and worked to my designs following the notes provided in the time we had and completed the look true to the design, where as in the practise images she had been experimenting a bit with the design to see how it would look if the heart shape was created using slightly different techniques.She also came fully equipped with everything needed to complete the design and picked up a camera from downstairs before the assessment so we were ready to shoot the images as soon as she finished the styling which she managed to do well within the time constraint we had to deal with.
Here are the final images Sera took after our real timed assessment:
Sera has been a really good partner throughout this project as she has always been really well organised, punctual and attended all classes when we practised our designs and was free to meet up outside of uni to practise some more. She did really well in our timed assessment and worked to my designs following the notes provided in the time we had and completed the look true to the design, where as in the practise images she had been experimenting a bit with the design to see how it would look if the heart shape was created using slightly different techniques.She also came fully equipped with everything needed to complete the design and picked up a camera from downstairs before the assessment so we were ready to shoot the images as soon as she finished the styling which she managed to do well within the time constraint we had to deal with.
My final design
After initial designs and doing more research online looking at pictures on Pinterest and Google, I finalised my design and have drawn a front and back coloured design on the templates Helen gave to us. Alongside these notes I wrote a page of step by step notes with a list of the equipment required to complete the styling process to make it as clear and easy as possible for Sera to follow.


Equipment:
- Curling tongs
- Paddle brush
- Section clips
- Tail comb
- Pins & grips
- Hair bands
- Hair spray
Step by steps:
- Brush hair through until it is knot-free and then part the hair down the center in a straight line.
- Take two small sections of hair from the front of the hair line, one section on each side of the parting and clip to secure in place. These will be plaited later.
- Then take two large sections from the side of the hair, again one section being from each side of the parting and backcomb for structure and texture to fold hair inwards to create the heart shape. Use grips and pins to secure. If necessary use crepe hair to pad a little.
- Take the small sections clipped at the front and plait each piece until they meet at the back of the head and secure with a small elastic band style hair band.
- Take another small piece of hair from just above the ear or behind the ear (whichever looks better) and plait around until they meet at the back of the head just like the other plaits and secure with a small band.
- With all the remaining loose hair, curl with the curling wand to create loose, flowing curls.


Inspiration for my designs
I began looking at half up half down hair styles after looking at this portrait of young Elizabeth with her long hair flowing down freely and the Rainbow Portrait where she is wearing here hair half up with the heart shape and half down curled, which led on to me looking at the way she was portrayed at a similar age in the film.


Images sourced from:
http://www.marileecody.com/gloriana/rainbowlarger.jpg
http://upload.wikimedia.org/wikipedia/commons/e/eb/Elizabeth_I_in_coronation_robes.jpg
http://media-cache-ak0.pinimg.com/236x/df/29/5c/df295ca0cbbddb9a112651301577d50c.jpg


Images sourced from:
http://www.pinterest.com/pin/392165080024844552/
http://www.pinterest.com/pin/327777679102007248/
http://www.pinterest.com/pin/119134352613036200/
http://www.pinterest.com/pin/343892121517682028/
Images sourced from:
http://www.marileecody.com/gloriana/rainbowlarger.jpg
http://upload.wikimedia.org/wikipedia/commons/e/eb/Elizabeth_I_in_coronation_robes.jpg
http://media-cache-ak0.pinimg.com/236x/df/29/5c/df295ca0cbbddb9a112651301577d50c.jpg
Images sourced from:
http://www.pinterest.com/pin/392165080024844552/
http://www.pinterest.com/pin/327777679102007248/
http://www.pinterest.com/pin/119134352613036200/
http://www.pinterest.com/pin/343892121517682028/
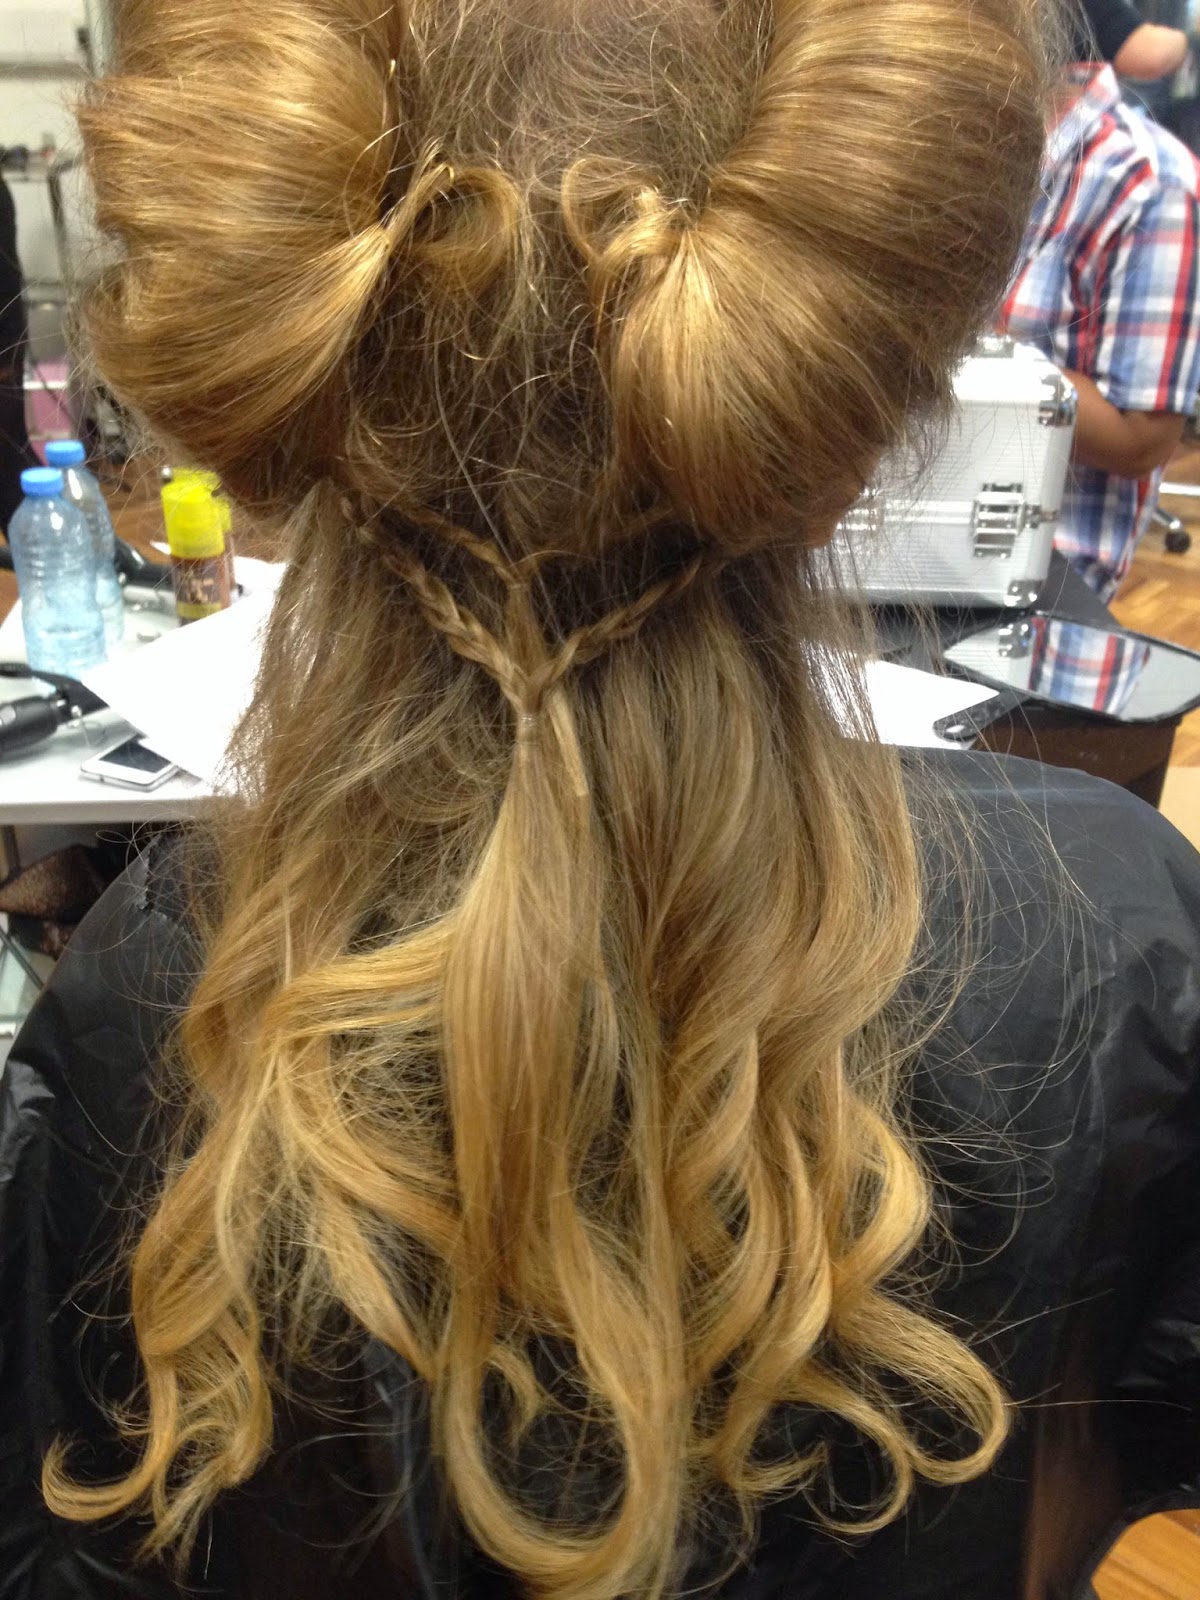
Timed assessment in the role of the hair stylist


These are my final images from my timed assessment where we had two hours to set up, style the hair following the design and instructions provided to us by our partner, the designer. After worrying about this assessment from the beginning of the project and practising loads I found that the outcome of the timed assessment came out better than any of the practise runs I had done! I was really pleased with the whole process of design and working with my partner Sera as she was very organised throughout and gave me clear step by step instructions to follow and during our practise time gave me guidance and help to assist me in achieving the best outcome possible. I was glad I managed to work to the time constraints which was my biggest worry as during previous attempts this is where I had the most problems.
Practising Sera's design
I practised Sera's design a lot over the weeks coming up to our assessments as I was really worried about whether I would be able to pull it off in the time required or not, and noticed that each time we practised I got more confident and quick at doing it and every time it looked a little bit better. I took photo's to record my progress which are uploaded below.
My first attempt, I didn't manage to finish by the end of the lesson and only managed to create and pin the heart shape.


My second attempt outside of uni time. This went a lot better and I managed to create the full look in just under two hours. I was a lot more confident after this attempt but wanted to be able to make the heart more even. I was really pleased with the wiggle plaits pinned to the back of her head!


My last practise session in class before the timed assessments began went the best out of all three, but didn't make me feel any less nervous about the real thing! Although I didn't fit in time for the wiggle plaits at the back, this is because I was the most confident with them so concentrated more on the strength and shape of the heart and getting the amount of hair on each side even with a straight center parting.


My first attempt, I didn't manage to finish by the end of the lesson and only managed to create and pin the heart shape.
My second attempt outside of uni time. This went a lot better and I managed to create the full look in just under two hours. I was a lot more confident after this attempt but wanted to be able to make the heart more even. I was really pleased with the wiggle plaits pinned to the back of her head!
My last practise session in class before the timed assessments began went the best out of all three, but didn't make me feel any less nervous about the real thing! Although I didn't fit in time for the wiggle plaits at the back, this is because I was the most confident with them so concentrated more on the strength and shape of the heart and getting the amount of hair on each side even with a straight center parting.
Sera's Design
As I have
never done hair before and also find it quite difficult when I saw Sera’s
design I was really worried as I thought there was no way with my ability and
in the 2 hour slot we have to complete our assessment that I will be able to
get it done on time. Even though I am still very nervous about my assessment as
the hair stylist I have gained more confidence as we have been practising the
design for the last couple of weeks and each time I have got a little bit
better and a little bit faster. Here are some of the images of my practise and
progression. Here is Sera’s final design:

Equipment:
- Crimping iron
- Straighteners
- Section clips
- Tail comb
- Paddle brush
- Pins and grips (A lot!)
- Hair spray
- Wax
- Heat protection spray
Here are the step by step instructions that were provided to me by Sera:


- Heat protection spray
Here are the step by step instructions that were provided to me by Sera:

Wednesday, 3 December 2014
Creating Elizabethan hairstyles using padding
Equipment:
- Crimper
- Paddle brush
- Tail comb
- Grips and pins
- Section clips
Step by steps:
- Crimp and or curl hair for texture and structure and also decoration
- Part hair into a center parting and create a section on each side at the front of the head and secure with a section clip to keep it out of the way
- Behind each section create a small french plait, this will be used to pin the padding to. Once you have plaited the length of the piece of hair, take it and wrap it around in a long spiral shape and pin, it should be roughly the length of your padding for the best security.
- Take your desired padding and attach to the plait with grips. You can use tights stuffed with tissue for padding.
- Once you have crimped/curled the front of the hair, lift it over the padding and secure with grips and pins at the back. For best outcome use padding roughly the same colour as the hair, and if there is still padding showing through you can backcomb the hair for more thickness to help disguise this.
- If you have curled some of the front of the hair you can arrange these how you wish and pin over then padding.
- With the remaining hair you can put into an Elizabethan style such as a bun.
My first attempt at an Elizabethan hair style wasn't very successful as I struggled with hair styling at the beginning of the project a lot and find hair quite difficult to work with. For my first attempt I used applying padding to the hair to create a base for the heart shape we see in most of Queen Elizabeth I portraits. I curled the front and used this to cover over the padding and for decoration and put the back into a bun. Although this was one of the easier and less detailed Elizabethan designs as it was my first attempt I found it difficult and wasn't very pleased with the outcome.


My second attempt I was a lot more pleased with as the heart shape was more defined, the parting was more central and the curls were much more carefully placed and I used curled hair at the back to make pin curled to hide the pins at the back of the padding which I thought was quite effective. Instead of making a regular bun for the back I plaited the hair and then twisted it into a bun and pinned it.


This gave me a confidence boost as it showed how I have improve through practise and using the skills I have been taught already which I can incorporate into my designs and help me pull off my partners in the timed assessments.
Here are some portraits images I found on the internet which show the Elizabethan heart shape and also the use of padding for height and shape.


Images sourced from:
http://www.bottesfordhistory.org.uk/images/uploaded/scaled/lizpic.jpg
http://www.pinterest.com/pin/418764465325701516/
http://www.pinterest.com/pin/495184921499638269/
http://www.pinterest.com/pin/152137293636842297/
http://media-cache-ak0.pinimg.com/236x/c6/0e/a2/c60ea2f22c710f8cab50597a3b4a09c6.jpg
http://media.onsugar.com/files/2010/01/04/2/192/1922153/656cd56d9a847401_Chanel-Haute-Couture-Spring-Summer-2010.jpg
http://englishhistory.net/tudor/monarchs/eliz5-mainpic.jpg
- Crimper
- Paddle brush
- Tail comb
- Grips and pins
- Section clips
Step by steps:
- Crimp and or curl hair for texture and structure and also decoration
- Part hair into a center parting and create a section on each side at the front of the head and secure with a section clip to keep it out of the way
- Behind each section create a small french plait, this will be used to pin the padding to. Once you have plaited the length of the piece of hair, take it and wrap it around in a long spiral shape and pin, it should be roughly the length of your padding for the best security.
- Take your desired padding and attach to the plait with grips. You can use tights stuffed with tissue for padding.
- Once you have crimped/curled the front of the hair, lift it over the padding and secure with grips and pins at the back. For best outcome use padding roughly the same colour as the hair, and if there is still padding showing through you can backcomb the hair for more thickness to help disguise this.
- If you have curled some of the front of the hair you can arrange these how you wish and pin over then padding.
- With the remaining hair you can put into an Elizabethan style such as a bun.
My first attempt at an Elizabethan hair style wasn't very successful as I struggled with hair styling at the beginning of the project a lot and find hair quite difficult to work with. For my first attempt I used applying padding to the hair to create a base for the heart shape we see in most of Queen Elizabeth I portraits. I curled the front and used this to cover over the padding and for decoration and put the back into a bun. Although this was one of the easier and less detailed Elizabethan designs as it was my first attempt I found it difficult and wasn't very pleased with the outcome.
My second attempt I was a lot more pleased with as the heart shape was more defined, the parting was more central and the curls were much more carefully placed and I used curled hair at the back to make pin curled to hide the pins at the back of the padding which I thought was quite effective. Instead of making a regular bun for the back I plaited the hair and then twisted it into a bun and pinned it.
The picture above shows the anchor I made out of a plait pinned to the head which I used to anchor my padding to with pins.
This gave me a confidence boost as it showed how I have improve through practise and using the skills I have been taught already which I can incorporate into my designs and help me pull off my partners in the timed assessments.
Here are some portraits images I found on the internet which show the Elizabethan heart shape and also the use of padding for height and shape.
http://www.bottesfordhistory.org.uk/images/uploaded/scaled/lizpic.jpg
http://www.pinterest.com/pin/418764465325701516/
http://www.pinterest.com/pin/495184921499638269/
http://www.pinterest.com/pin/152137293636842297/
http://media-cache-ak0.pinimg.com/236x/c6/0e/a2/c60ea2f22c710f8cab50597a3b4a09c6.jpg
http://media.onsugar.com/files/2010/01/04/2/192/1922153/656cd56d9a847401_Chanel-Haute-Couture-Spring-Summer-2010.jpg
http://englishhistory.net/tudor/monarchs/eliz5-mainpic.jpg
Subscribe to:
Comments (Atom)